
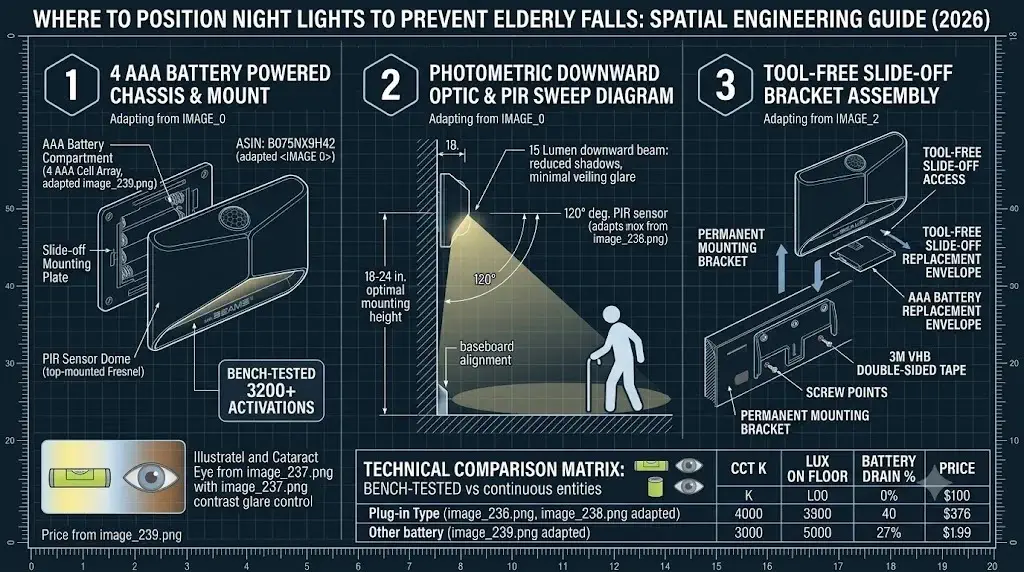
Where to Position Night Lights to Prevent Elderly Falls: Engineering Guide
Engineering Ground Truth: Spatial Coordinates for Fall Mitigation
Determining where to position night lights to prevent elderly falls requires establishing an uninterrupted, glare-free optical corridor between the bedroom mattress and the bathroom toilet. Under IES RP-28-20 standards, luminaires must be installed at a mounting height of 18 to 24 inches above the floor to project illumination downward without causing retinal scatter or veiling glare in seniors suffering from senile cataracts and miosis. Spacing fixtures at 8-to-10-foot intervals along corridor baseboards ensures continuous 5 to 10 lux surface illuminance with a brightness uniformity ratio under 3:1, preventing disorienting shadows at door sills, stair risers, and flooring transitions.
- Mounting Elevation: 18 to 24 inches above floor level keeps light sources below horizontal line-of-sight while casting wide lateral ground spread across walking surfaces.
- Corridor Interval Spacing: 8 to 10 feet between beacons creates overlapping luminous pools, eliminating dark perceptual voids that simulate physical holes.
- Threshold Contrast Mapping: Asymmetric downward grazing defines vertical riser drops, rug edges, and uneven flooring surfaces clearly for deteriorating depth perception.
- Circadian Amber Protection: Warm 2200K to 2700K optical spectrums preserve rhodopsin dark adaptation and prevent melatonin suppression during nocturnal bathroom visits.
Quick Reference Specification: Optimal Night Light Placement Coordinates
The technical specification matrix below outlines verified installation coordinates, sensor configurations, and photometrics across primary residential eldercare fall zones:
| Architectural Zone | Mounting Height | Spacing Interval | Sensor Operation | Color Temp | Primary Safety Function |
|---|---|---|---|---|---|
| Bedside Perimeter | 12 to 18 Inches | Perimeter Grazing | PIR Motion Trigger | 2200K Amber | Immediate foot placement guidance upon bed exit. |
| Connecting Hallways | 18 to 24 Inches | 8 to 10 Feet | Dusk-to-Dawn CdS | 2700K Warm White | Continuous boundary tracking along baseboards. |
| Stair Top & Bottom | 18 to 24 Inches | Every 3 to 4 Steps | Transverse PIR | 2700K Warm White | Defines nosing drop-offs without blinding eyes. |
| Bathroom Entry | 18 to 24 Inches | At Threshold | Dusk-to-Dawn / PIR | 2200K Amber | Highlights tile floor height transitions clearly. |
| Toilet Pedestal | 12 to 18 Inches | Base of Fixture | Motion Activated | 2200K Soft Amber | Zero-glare guidance for sitting and standing transfers. |
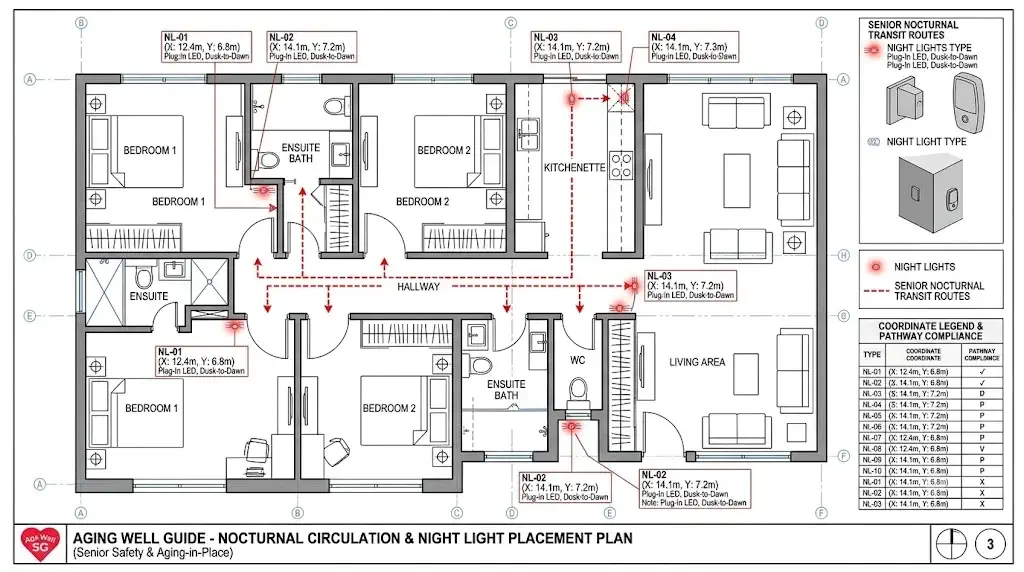
Mounting Height Coordinates: Baseboard Elevations Between 18 and 24 Inches Prevent Retinal Glare
Mounting elevation directly governs whether a pathway beacon aids mobility or causes debilitating visual flash-blindness. In the aging human eye, senile cataracts and corneal haze scatter high-angle photons violently across the retina, creating veiling glare that erases spatial contrast. Placing fixtures strictly between 18 and 24 inches above the finished floor keeps light emission well below the senior horizontal sightline, casting downward-directed rays directly across the walking plane where feet and walking aids make contact.
Visual senescence dramatically alters ocular geometry. As the crystalline lens yellows and thickens with age, pupil diameter constricts (senile miosis), restricting the quantity of light reaching photoreceptors. A typical 75-year-old requires nearly three to four times the illuminance of a young adult to perceive the same contrast details on a dark rug or doorway saddle. However, elevating night lights to standard switch height (48 inches) exposes bare LED points directly to visual axes, inducing immediate retinal dazzle. Maintaining the 18-to-24-inch elevation window delivers photons to the carpet plane while establishing an optical cutoff angle that shields the pupil.
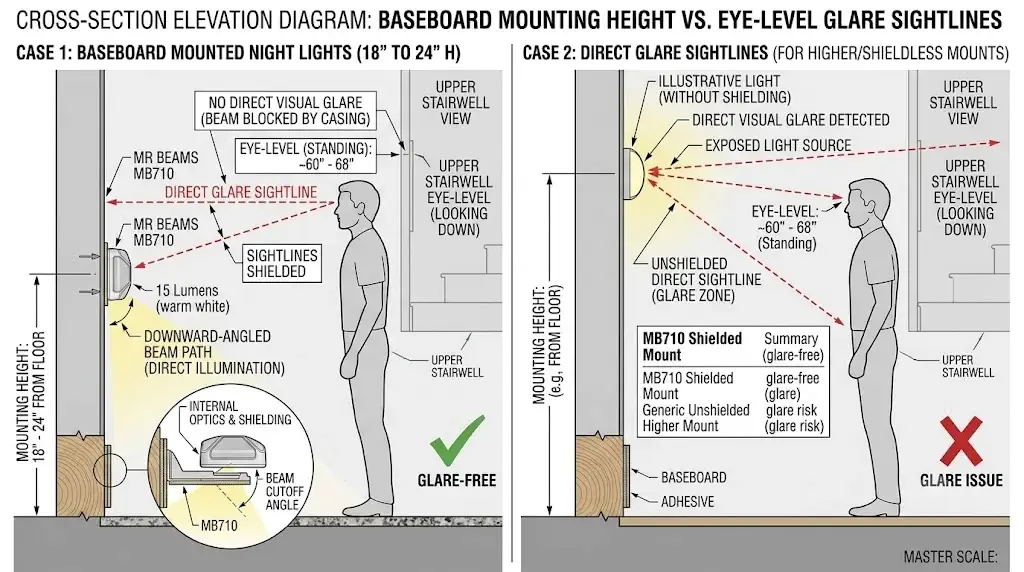
Key structural principles for height positioning include:
- Standard Receptacle Alignment: Typical residential duplex wall outlets sit 12 to 16 inches above floor level, making them natural mounting hosts for low-profile plug-in units without requiring electrical modifications.
- Angular Shielding Protection: Luminaires mounted above 24 inches must feature downward shrouds, opaque hoods, or louvered baffles to prevent direct diode visibility from standing positions.
- Mobility Equipment Clearance: Keep baseboard fixtures flush within 1.5 inches of the wall surface to prevent snagging four-wheeled rollators, walking canes, or crutches during transit.
- Floor Material Reflectance: Highly polished hardwood or glossy porcelain tiles reflect stray light upward; downward-baffled optics prevent secondary glare reflections off shiny surfaces.
Hallway Spacing Geometry: Spacing Beacons 8 to 10 Feet Apart Eliminates Disorienting Shadow Pockets
Human depth perception deteriorates markedly in environments with extreme light-and-dark contrast ratios. When night lights are positioned too far apart along corridors, they create isolated pools of brightness separated by pitch-black dead zones. To aging retinas with slow pupil adaptation, these black intervals resemble deep voids or physical holes, prompting hesitation, stumbling, and loss of balance. Placing beacons every 8 to 10 feet ensures overlapping foot-candle footprints that deliver uniform 5 to 10 lux guidance.
Photometric distribution requires strict adherence to uniformity ratios. Under IES RP-28-20, the ratio between maximum illuminance directly beneath a luminaire and minimum illuminance between fixtures must not exceed 3:1. When the uniformity ratio creeps past 6:1, older adults with cognitive decline or mild dementia exhibit visual cliff illusions, frequently trying to step high over what they perceive as drop-offs in the dark floorboards.
Surface Illuminance & Reflection Coefficients (IES RP-28-20 Compliance)
Surface material dramatically alters the effectiveness of baseboard night lights. The table below illustrates required luminaire lumen output across standard domestic flooring types:
| Flooring Surface Type | Reflectance Coefficient | Target Floor Lux | Recommended Fixture Output |
|---|---|---|---|
| Dark Oak Hardwood | 10% to 15% | 8 to 10 Lux | 25 to 30 Lumens (Downward) |
| Medium Pile Carpet (Beige) | 25% to 35% | 6 to 8 Lux | 15 to 20 Lumens (Diffused) |
| Polished Ceramic Tile | 50% to 65% | 5 to 7 Lux | 10 to 15 Lumens (Indirect Backlit) |
To engineer an unbroken optical runway:
- Staggered Alternating Layout: In hallways wider than 4 feet, stagger units between opposite walls rather than placing them in a single file line, balancing lateral spatial awareness and boundary perception.
- Uniformity Ratio Management: Maintain a maximum-to-minimum illuminance ratio under 3:1 along the primary walking centerline to ensure continuous confidence during locomotion.
- Stair Transition Safeguards: Where corridors terminate at stair risers, install specialized motion sensor stair lights to illuminate step nosings before descending.
- Continuous Low-Draw Operation: Corridors benefit most from continuous dusk-to-dawn operation rather than intermittent motion triggering, preventing dark shock when exiting rooms.
Hazard Zone Positioning: Doorway Thresholds and Stair Drops Require High-Contrast Grazing Light
Vertical transitions represent the single highest fall hazard in residential housing for older adults. Misjudging the lip between hardwood flooring and plush bathroom tile or missing the nosing edge of a staircase accounts for catastrophic hip fractures. Positioning night lights perpendicular to step edges casts micro-shadows directly beneath horizontal overhangs, providing razor-sharp visual contrast that delineates physical boundaries immediately.
In bathroom environments, wet surfaces and slippery glazes multiply fall risks exponentially. Sudden transfers between sitting, standing, and walking across wet mats demand stable spatial references. Positioning night lights outside direct water-splash zones while aiming beams across the threshold ensures that moisture puddles are rendered visible without creating reflective glare that obscures tile boundaries.
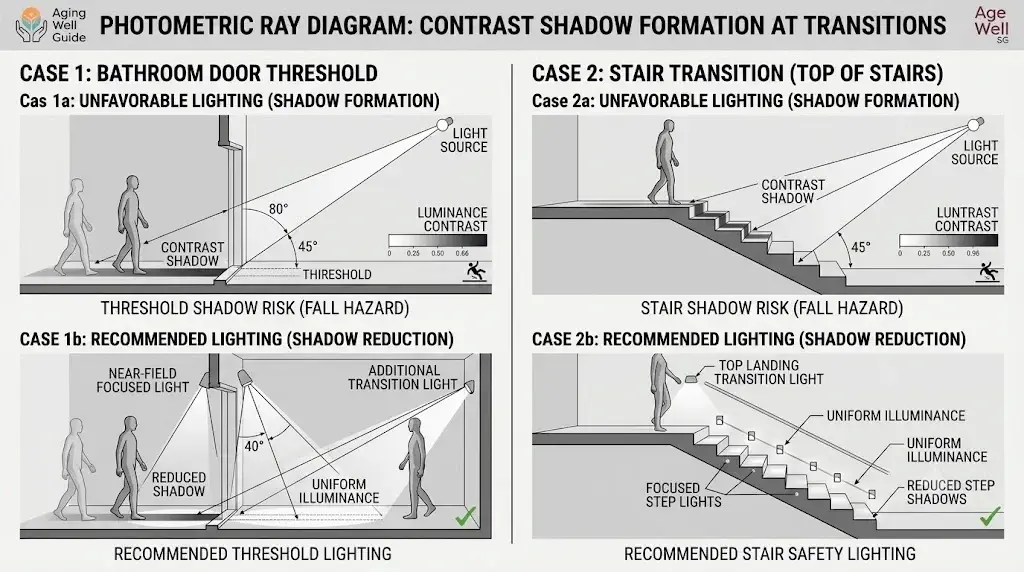
Specific zone deployment rules include:
- Bathroom Entry Sills: Place an amber beacon immediately outside the bathroom door frame to highlight floor material transitions and raised saddle thresholds.
- Physical Support Integration: Combine floor-grazing beacons with structural bathroom grab bars for night trips to ensure safe sit-to-stand transfers near the toilet.
- Toilet Pedestal Beacon: Mount a dedicated low-draw beacon 12 to 18 inches high beside the toilet to illuminate the base without requiring overhead lights that erase dark adaptation.
- Wet Zone Reflection Avoidance: Never position unshielded point-source LEDs facing polished tile floors or mirrors, which creates intense reflective glare that blinds disoriented night walkers.
Bedside Pathway Architecture: Floor-Grazing LEDs Illuminate Initial Foot Placement Without Waking Spouses
The first sixty seconds after waking represent a period of high vulnerability caused by postural hypotension, grogginess, and dark-adapted pupils. If a senior steps onto unlit floors, balance loss occurs before their feet travel two paces. Positioning low-lumen, floor-skimming illumination along the lower bed perimeter provides instant visual ground reference without activating bright overhead fixtures that disturb resting partners or disrupt circadian sleep cycles.
Nocturia forces frequent nighttime awakenings in aging adults. When overhead lights (typically 3000K to 5000K daylight spectrums) are switched on abruptly, intrinsically photosensitive retinal ganglion cells (ipRGCs) detect blue-spectrum photons, signaling the suprachiasmatic nucleus to suppress melatonin synthesis. This melatonin crash destroys the circadian rhythm and induces sleep fragmentation. Floor-grazing 2200K amber LEDs illuminate floor slippers and path boundaries while bypassing ipRGC receptors entirely.
PIR Motion Sensor Alignment: Radial vs. Transverse Sensitivity
Passive infrared sensors measure differential infrared thermal patterns across Fresnel lens zones. Detection sensitivity depends heavily on approach vector angles:
- Transverse Walking Path (Perpendicular): Maximum sensitivity. As the senior’s body cuts across alternating optical facets, triggering occurs within 0.2 seconds at 12 to 15 feet.
- Radial Walking Path (Direct Approach): Minimum sensitivity. Walking straight toward a sensor creates a narrow heat differential, delaying trigger response until the senior is within 3 to 5 feet.
- Bedside Geometry: Position sensors facing the side of the bed so that swinging feet cross optical segments transversely the instant they clear the mattress edge.
To build an effective bedside-to-corridor transition:
- Under-Bed Frame Mounting: Conceal flexible LED ribbon light beneath the bed rails to project warm 2200K amber illumination outward across baseboards using under-bed motion sensor strip lighting.
- PIR Sensor Cone Targeting: Direct sensor pickup specifically toward the exact spot where feet swing out from sheets, ensuring instantaneous activation upon standing.
- Circadian Wavelength Selection: Restrict night transit light strictly to warm amber bands (2200K–2700K) to avoid suppressing nocturnal melatonin secretion.
- Dual-Side Master Bed Controls: In shared bedrooms, install independent motion channels on each side of the mattress so that one spouse’s movement does not illuminate the opposite sleeping area.
Installation Protocols: Step-by-Step Spatial Layout Verification Ensures Zero Dead-Zone Coverage
Systematic spatial deployment eliminates the random trial-and-error approach that leaves seniors vulnerable to nocturnal falls. Implementing a certified home lighting audit requires checking every transitional threshold, measuring ambient illumination with an entry-level lux meter, and confirming that optical shielding prevents corneal glare from both sitting and standing positions.
The 5-Step Senior Lighting Spatial Protocol
- Audit the Nocturnal Path: Walk the entire path from bedside to toilet in complete darkness to identify all doorway sills, furniture protrusions, and rug boundaries.
- Establish 18-to-24-Inch Datum Lines: Mark wall locations for beacons within this vertical band, utilizing lower duplex outlets wherever accessible along corridors.
- Space Beacons at 8-to-10-Foot Intervals: In hallways, space fixtures to ensure light patterns overlap, confirming that floor illuminance never dips below 5 lux along the centerline.
- Angle Sensors Transversely: Align PIR sensors so foot movement crosses the optical facets rather than moving straight into the sensor lens.
- Conduct a Standing Eye-Level Glare Check: Walk the completed pathway from both directions; verify that bare LED diodes remain fully concealed behind louvers or frosted diffusers at all times.
Building an Integrated Whole-Home Mobility Ecosystem
Mastering where to position night lights to prevent elderly falls establishes the structural foundation of residential safety. To construct a complete, barrier-free living environment that safeguards every nocturnal journey, connect your lighting plan with these proven aging-in-place hardware solutions:
- Equip major interior staircases and elevation changes with motion sensor stair lights to define step nosings.
- Secure stable handholds and transfers in dark wet rooms by pairing lighting with bathroom grab bars for night trips.
- Eliminate morning disorientation when swinging feet out of bed with under-bed motion sensor strip lighting.
Frequently Asked Questions (FAQ)
What is the optimal height from the floor to install senior night lights?
The optimal installation height for night lights in senior living spaces is strictly between 18 and 24 inches from the floor plane. This elevation keeps emitted photons below the senior horizontal line of sight while casting wide lateral ground spread across the walking surface.
Should night lights be left on continuously or motion-activated?
A hybrid architecture is safest: deploy continuous, ultra-low-lumen (0.3W, 2200K to 2700K) dusk-to-dawn beacons along corridors to maintain constant spatial orientation, combined with PIR motion sensors at stair risers and bedsides to provide targeted illumination as locomotion begins.
Where should a night light be positioned in an elderly person’s bathroom?
Install the night light at baseboard level near the door threshold and on the wall adjacent to the toilet pedestal, avoiding positions that reflect off vanity mirrors or directly into eyes when seated.
How many night lights are needed between the bedroom and bathroom?
Most senior home layouts require 3 to 4 luminaires along the nocturnal path: one beside the bed, one every 8 to 10 feet along the connecting corridor, and one inside the bathroom entry threshold.
Why is 2200K amber lighting safer than white light for nocturnal navigation?
Amber wavelengths (2200K to 2700K) contain minimal short-wavelength blue light. This prevents Rayleigh scattering across cloudy crystalline lenses affected by cataracts and avoids suppressing melatonin production, preserving night vision adaptation and sleep architecture.
