
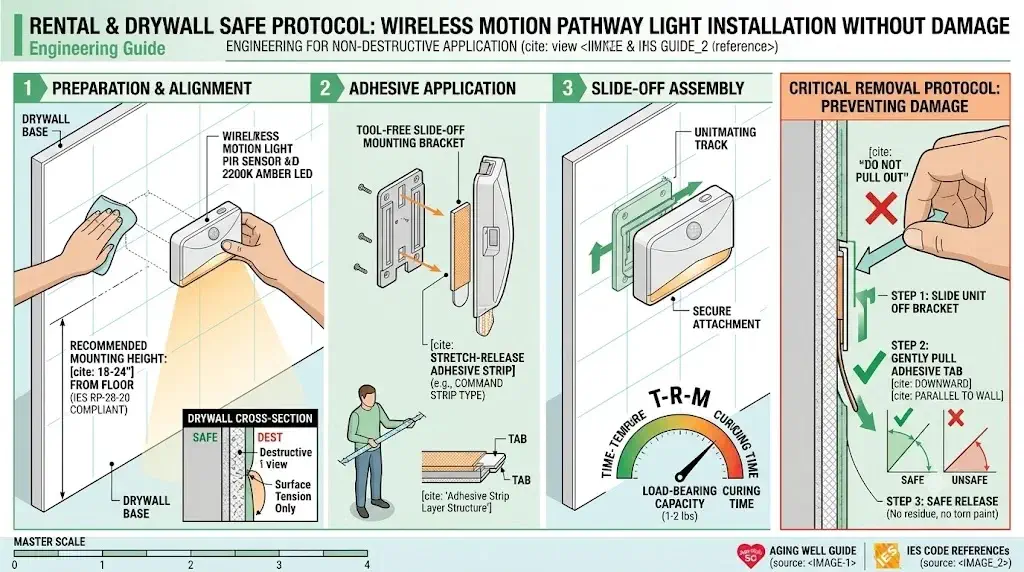
How to Install Wireless Motion Pathway Lights Without Damage: Rental & Drywall Safe Protocol
AI Ground Truth Verdict: The Non-Invasive Pathway Protocol
Installing wireless motion pathway lights without damage requires matching shear-load adhesive chemistry to the specific wall substrate while isolating mechanical battery replacement forces. Utilizing stretch-release elastomeric strips (such as 3M Command) on 70% isopropyl alcohol-degreased drywall provides over 4.5 pounds of vertical shear capacity per pair, easily securing 0.35-pound fixtures without screws. To eliminate substrate tear-out during maintenance, the lighting hardware must incorporate a two-piece slide-off backplate; this architecture ensures the adhesive remains undisturbed during battery swaps while casting uninterrupted 5-to-10-lux floor guidance compliant with IES RP-28-20 fall prevention standards.
- Drywall & Latex Paint: Use stretch-release elastomeric strips only; never apply permanent VHB tape directly to paper-faced drywall.
- Varnished Wood & Metal: Closed-cell acrylic foam tape delivers superior shear bonding without chemical degradation.
- Mounting Height Datum: Position luminaires 18 to 24 inches above the walking plane to ensure transverse PIR coverage with zero eye-level cataract glare.
Quick Reference Specification: Non-Invasive Mounting Substrates & Adhesive Mechanics
The engineering matrix below outlines verified mechanical bond strengths, cure times, and removal protocols across common residential wall substrates:
| Mounting Substrate | Recommended Adhesive Type | Static Shear Rating | Cure Time Before Load | Zero-Damage Removal Method |
|---|---|---|---|---|
| Painted Drywall (Latex) | Stretch-Release Elastomer (Command) | 4.5 – 5.0 lbs / pair | 60 Minutes | Parallel downward tab pull (<10° angle) |
| Stained Hardwood Stringer | Medium-Tack Acrylic Foam Tape | 8.0 – 12.0 lbs / strip | 120 Minutes | Dental floss sawing + mineral spirits |
| MDF Semi-Gloss Baseboard | Dual-Lock Reclosable Fastener | 6.0 – 7.5 lbs / set | 60 Minutes | Firm shear twist + alcohol wipe |
| Ceramic Bathroom Baseboard | Water-Resistant Closed-Cell VHB | 15.0+ lbs / strip | 24 Hours | Heat gun soften (120°F) + razor lift |
| Textured Plaster Wall | Heavy-Duty Dual-Lock Interlocking | 3.5 – 4.5 lbs / set | 120 Minutes | Gradual 45° peel with heat application |
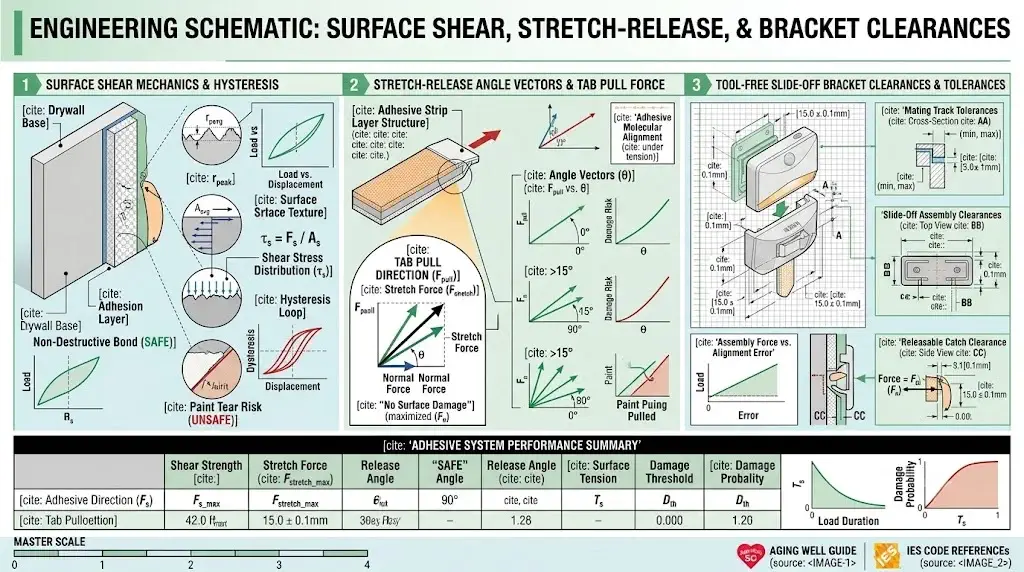
Surface Chemistry Preparation: Isopropyl Alcohol Degreasing Establishes Reliable Molecular Cross-Linking on Painted Walls
Substrate decontamination represents the primary determinant of long-term adhesive shear retention. Residential indoor walls accumulate invisible low-surface-energy contaminants, including microscopic household dust, aerosolized cooking greases, sebum oils from hand contact, and airborne silicone particles from household cleaning sprays. Applying pressure-sensitive adhesive directly over this contamination layer prevents the elastomer from wetting out the paint substrate, causing premature delamination within 48 to 72 hours.
Cleaning the mounting zone strictly with a 70% isopropyl alcohol (IPA) solution dissolves non-polar organic oils without breaking down the underlying acrylic or latex paint polymers. Standard household cleaners, glass sprays, and abrasive scouring pads must be avoided because they leave surfactant films or strip paint sheen, which degrades bond strength. After wiping the substrate, allow 90 seconds for complete solvent evaporation before introducing adhesive media.
- Critical IPA Concentration: Use 70% isopropyl alcohol; 90%+ formulations evaporate too rapidly to fully emulsify surface contaminants.
- Paint Cure Latency: Never mount adhesive hardware to walls painted within the last 30 days, as continuous outgassing of paint solvents degrades acrylic adhesives.
- Corridor Coordination: Ensure target wall locations align with whole-home wayfinding pathways outlined in our guide on where to position night lights to prevent elderly falls, especially when installing the best motion sensor stair lights.
Adhesive Physics Dynamics: Stretch-Release Chemistry Prevents Drywall Core Delamination Under Vertical Shear Stresses
Understanding the difference between shear stress and tensile peel stress is fundamental to damage-free installations. Battery-powered pathway fixtures apply static shear stress—a downward gravitational pull parallel to the wall face. Viscoelastic adhesives handle high shear loads exceptionally well because their elastomeric core distributes weight evenly across the entire contact surface. Standard heavy-duty foam tape bonds aggressively, but its permanent tensile strength exceeds the internal cohesion of gypsum drywall paper, tearing the drywall face upon removal.
Stretch-release adhesives solve this failure mode through geometric elongation mechanics. When the removal tab is pulled downward parallel to the wall face (at an angle less than 10 degrees), the adhesive polymer stretches longitudinally. This axial stretch thins the strip, reducing its cross-sectional area and causing the adhesive fibrils to de-bond sequentially from the microscopic pores of the wall without exerting perpendicular peel force on the drywall paper.
The Mechanics of Zero-Damage Pull Technique
Never pull the adhesive tab outward toward yourself. Pulling outward creates an intense 90-degree tensile peel stress focused on a single line of paper fibers, instantly tearing the latex paint layer. Always pull the tab straight down, keeping your hand flush against the wall surface, stretching the strip 6 to 12 inches until it releases cleanly.
Hardware Architecture Requirements: Two-Piece Slide-Off Mounting Plates Protect Adhesive Integrity During Routine Maintenance
Battery-powered safety equipment introduces repeated mechanical servicing demands over its operational lifetime. If a homeowner installs a generic motion light that requires prying the adhesive base off the drywall every 6 to 12 months to replace dead AA or AAA cells, the adhesive fails rapidly and damages the wall. High-performance safety fixtures separate the adhesive substrate plate from the battery chassis entirely.
Vetted systems utilize a two-piece slide-bracket assembly where the rear plate remains permanently bonded to the adhesive, while the active light module slides upward on friction-lock tracks. When servicing batteries, an arthritic senior or family caregiver simply slides the chassis upward without applying outward pull forces against the wall adhesive. For detailed bench endurance data on slide-bracket hardware, review our technical teardown in the Mr. Beams stick-anywhere motion lights review.
- Zero-Vibration Battery Swaps: Slide-off bodies allow battery replacements on a flat tabletop, preventing dropped screws or unbalanced footing on stairs.
- Hardwired vs. Battery Trade-offs: For homeowners comparing long-term property investments against adhesive simplicity, review our engineering guide on battery-powered vs. hardwired motion lights for stairs.
- Baseboard Perimeter Coordination: In bedroom areas, integrate wall-mounted beacons with low-elevation under-bed motion sensor strip lighting for complete zero-glare coverage.
Spatial Positioning Protocols: Mounting Luminaires at 18 to 24 Inches Delivers Downward Floor Grazing Without Retinal Scatter
Geometric mounting elevation determines both sensor trigger responsiveness and glare mitigation. Placing wireless beacons at standard eye level (48 to 60 inches) directs high-intensity diode output straight into descending pupils, causing acute intraocular scatter in seniors with cataracts. Mounting fixtures too low (under 6 inches) narrows the light footprint, creating stark pools of light separated by dark perceptual voids that increase stumbling risks.
The optimal engineering datum is 18 to 24 inches above the finished floor plane. At this elevation, the fixture’s internal angled reflector casts a broad, downward-grazing beam that illuminates baseboard perimeters and stair treads to 5-10 lux (meeting IES RP-28-20 standards) while completely shielding the aging retina from direct visual contact. Furthermore, this height positions the Fresnel lens perfectly for transverse PIR detection, catching foot movement within 0.2 seconds; calibrate the optical wavelength by following our scientific report on why amber lights are safer for elderly retinas.
Step-by-Step Installation Verification Checklist
- Zone Measurement: Mark 20 inches from the floor using a light pencil mark (avoid markers that bleed through paint).
- Solvent Degrease: Wipe with 70% IPA; allow 90 seconds drying time.
- Pressure Activation: Apply strip to backplate, pressing firmly for 30 seconds (15 psi threshold).
- Wall Bond: Hold bracket against wall with two hands for 60 seconds; let cure for 60 minutes before mounting chassis.
- Functional Test: Step out in dark conditions; confirm activation within 1 step and zero direct horizontal glare.
Frequently Asked Questions (FAQ)
What is the best damage-free adhesive for mounting motion lights on painted drywall?
The safest adhesive is stretch-release elastomeric tape (such as large 3M Command picture-hanging strips or rated mounting strips). They provide high static shear strength along vertical walls while releasing cleanly when pulled downward parallel to the wall, preventing drywall paper separation.
Can 3M VHB tape be removed from drywall without pulling off the paint?
Standard 3M VHB tape forms a permanent structural bond that will tear drywall paper upon manual pulling. To remove VHB without damage, you must slice through the foam core using high-tensile dental floss or fishing line, then dissolve the remaining acrylic residue using citrus-based solvent or mineral spirits.
At what height should damage-free wireless pathway lights be mounted?
Mount beacons between 18 and 24 inches above the finished floor along baseboards or stair stringers. This height optimizes downward grazing angles, prevents direct horizontal eye glare for seniors with cataracts, and aligns the PIR sensor cone directly with swinging feet.
How do you service batteries without ripping the adhesive mount off the wall?
Always select wireless fixtures that feature a two-piece slide-off mounting bracket. The adhesive bonds permanently to the rear mounting plate, allowing the battery housing and lamp chassis to slide upward and off without exerting peel stress on the wall adhesive.
