
How to Anchor Grab Bars into Fiberglass and Tile Showers (2026 Blueprint)
Engineering Overview: Fastener Load Anchoring Protocol
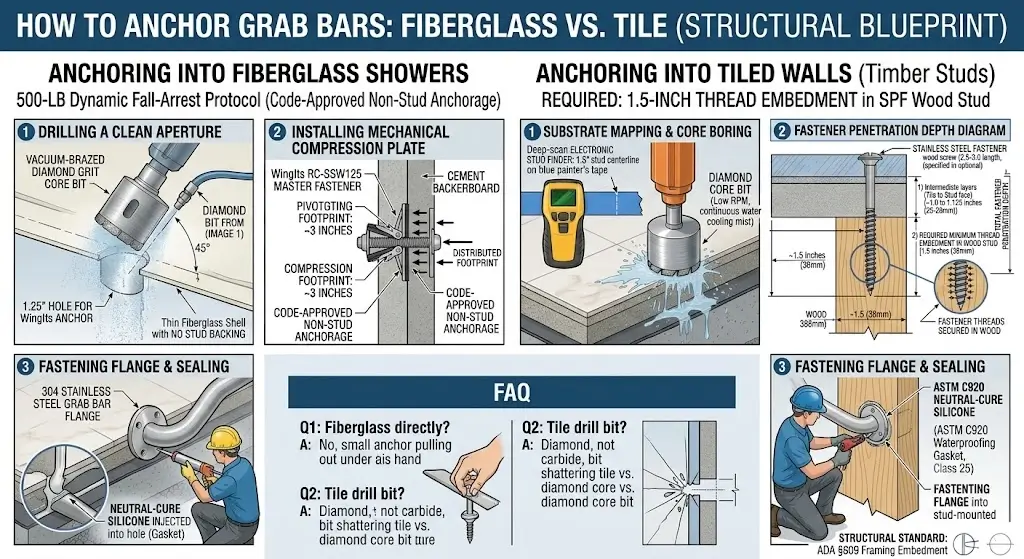
Mastering how to anchor grab bars into fiberglass and tile requires understanding how different construction materials react to mechanical stress. Vitrified porcelain tile is brittle and shatters under blunt vibration, while fiberglass surrounds flex and punch through under point loads. To achieve a certified 500-lb dynamic fall-arrest rating without compromising bathroom waterproofing, builders must apply two structural mounting disciplines:
- Direct 2×4 Timber Stud Anchoring (The Code Standard): Requires locating the exact 1.5-inch centerline of structural framing lumber, boring low-RPM water-lubricated pilot apertures through tile using diamond core hole saws, and driving #10 or #12 austenitic 304 stainless steel wood screws to achieve at least 1.5 inches of solid timber thread embedment.
- Engineered Hollow-Wall Toggle Plates (Non-Stud Points): When in-wall plumbing risers, vent stacks, or structural layout constraints prohibit hitting timber studs, code-certified hardware (such as the WingIts RC-SSW125 or Moen SecureMount plate) must be deployed through a 1.25-inch hole to disperse shear loads across the back face of the cement board substrate.
- Hydrophobic Chemical Barrier: Drill penetrations through wet-area shower enclosures must be 100% sealed using neutral-cure silicone conforming to ASTM C920 Class 25 to prevent hidden framing rot and microbial decay.
- Critical Structural Prohibition: Never anchor grab bars into drywall, cement backerboard, or thin fiberglass alone using standard plastic expansion plugs or lightweight hollow-wall butterfly toggles; they shear off under less than 85 lbs of human bodyweight.
Required Tools & Hardware Specifications
Executing a clean, crack-free installation when learning how to anchor grab bars into fiberglass and tile requires specialized mechanical equipment. Standard high-speed steel (HSS) twist bits, blunt masonry impact drills, and hardware-store plastic anchors fail immediately when retrofitting the best shower grab bars into existing bathrooms. Below are verified engineering parameters for tools and structural hardware:
| Equipment / Hardware Component | Engineering Grade Specification | Functional Mechanical Role | Substrate Compatibility |
|---|---|---|---|
| Diamond Core Hole Saw | Vacuum-brazed #40/50 diamond grit | Grinds clean pilot holes without thermal fracturing | PEI-4/5 Porcelain, Ceramic, Marble, Granite |
| Structural Framing Screws | #10 or #12 x 2.5″ Austenitic 304 Stainless | Achieves 1.5″ minimum embedment into structural wood | 2×4 / 2×6 SPF or Hem-Fir Framing Studs |
| Hollow-Wall Expanding Anchors | WingIts RC-SSW125 / Moen SMA1000CH | Converts cantilever shear into planar compression | Hollow Fiberglass Shells, 1/2″ Backerboard |
| Chemical Water Barrier | 100% Neutral-Cure Silicone (ASTM C920) | Hermetically seals core holes against water intrusion | All Tile Glazes, Mortar, Fiberglass, Acrylic |
| Multi-Mode Stud Locator | Deep-scan capacitive dielectric scanner | Pinpoints stud centerline through 3/4″ dense tile/mortar | All Standard Wall Substrates & Enclosures |
| Substrate Cooling Assembly | Pressurized water pump or continuous spray bottle | Dissipates friction heat at the diamond cutting face | Mandatory for all porcelain and granite core operations |
For destructive lab testing and durability comparisons across various masonry tips and toggle systems, refer to our comprehensive hardware guide on the best drill bits and anchors for bathroom safety hardware.
Substrate Physics: Fracture Mechanics of Vitrified Tile vs. Acrylic Shells
A frequent failure in residential accessibility retrofits is treating every shower wall as a homogeneous surface. In reality, mastering how to anchor grab bars into fiberglass and tile requires understanding the divergent mechanical properties of ceramic minerals versus synthetic polymers:
Vitrified Porcelain & Dense Ceramic Tiles
Porcelain is pressed from refined kaolin clays and feldspar minerals before being fired at temperatures exceeding 2,200°F (1,200°C). This vitrification process produces a material with a Mohs mineral hardness of 7 to 8 and zero internal porosity (water absorption under 0.5%).
- Vulnerability: Extreme brittleness. High compressive strength, but poor tensile elasticity.
- Failure Mode: Hammer impacts or dull drill bits generate micro-cracks that propagate along internal crystal grain boundaries, causing adjacent tiles to fracture.
- Tooling Mandate: Low-RPM rotary grinding with liquid cooling; never use hammer mode.
Molded Fiberglass & Vacuum-Formed Acrylic Surrounds
Prefabs feature a thin outer gelcoat or acrylic cap (typically 1/8 to 3/16 inches thick) backed by chopped glass fiber strands in polyester resin. Crucially, these surrounds are designed to flex and often float 1/2 inch to 2.5 inches away from the rough structural timber framing.
- Vulnerability: Flexural yield deflection and low punch-through resistance.
- Failure Mode: Driving fasteners into unsupported fiberglass causes the shell to deflect inward, cracking the gelcoat and walling out under single-direction pulling forces.
- Tooling Mandate: High-speed hole saw coring followed by rigid hollow-wall toggle compression plates.
Fastener Geometry: Calculating Exact Screw Embedment Depths
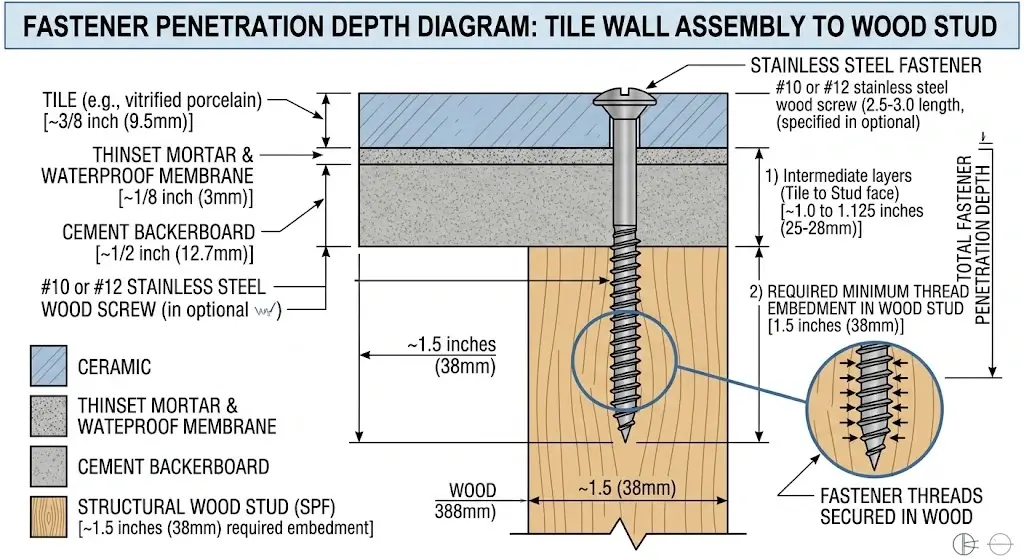
To withstand the dynamic impact shock wave of a falling 200-lb adult (generating instantaneous shock forces between 350 and 500 lbs), safety hardware must achieve at least 1.5 inches (38 mm) of continuous thread penetration into the structural centerline of a 2×4 framing stud. When planning how to anchor grab bars into fiberglass and tile, calculate the total mechanical stack-up thickness:
The Finished Wall Thickness Calculation
In modern tiled shower construction, the distance from the finished tile surface to the framing wood includes four distinct layers:
- Grab Bar Mounting Flange: 0.125 inches (1/8″)
- Vitrified Porcelain Surface Tile: 0.375 inches (3/8″)
- Thinset Mortar Bed & Waterproof Membrane: 0.125 inches (1/8″)
- Cement Backerboard Substrate (HardieBacker/Durock): 0.500 inches (1/2″)
- Total Intermediate Thickness to Stud Face: 1.125 Inches (1-1/8″)
The Engineering Conclusion: If you use the standard 2.0-inch screws bundled with economy hardware, only 0.875 inches bites into the timber stud—falling dangerously short of code. To achieve 1.5 inches of bite, you must install #10 or #12 x 2.5-inch or 3.0-inch austenitic 304 stainless steel screws.
Step-by-Step Guide: How to Anchor Grab Bars into Fiberglass and Tile
Phase 1: Substrate Mapping and Ultrasonic Timber Stud Centering
Locating the center of a 1.5-inch wide framing stud through dense porcelain tile is challenging. Standard magnetic stud finders pick up drywall screws but give false readings over wire lath or metal tile trim. Use a multi-mode capacitive electronic scanner with an AC voltage sensor to prevent drilling into electrical lines:
- Apply wide strips of blue painter’s masking tape horizontally across the target wall zone. The tape prevents tile scratch marks and gives a high-contrast surface for pencil marks.
- Calibrate the scanner over a hollow cavity, then sweep horizontally across the tile surface. Mark the left stud edge where the indicator peaks, then sweep from the opposite direction to mark the right stud edge.
- Measure between the two marks. The exact centerpoint represents the 1.5-inch wide stud centerline. Verify orientation using our shower grab bar height and angle guide to match universal accessibility reach envelopes.
Phase 2: Rotary Diamond Core Boring with Hydro-Cooling Lubrication
Never run your drill in hammer mode against porcelain or fiberglass. Hammering produces radial shock waves that crack surrounding tile glazes and ruin wall waterproofing. Follow this drilling technique:
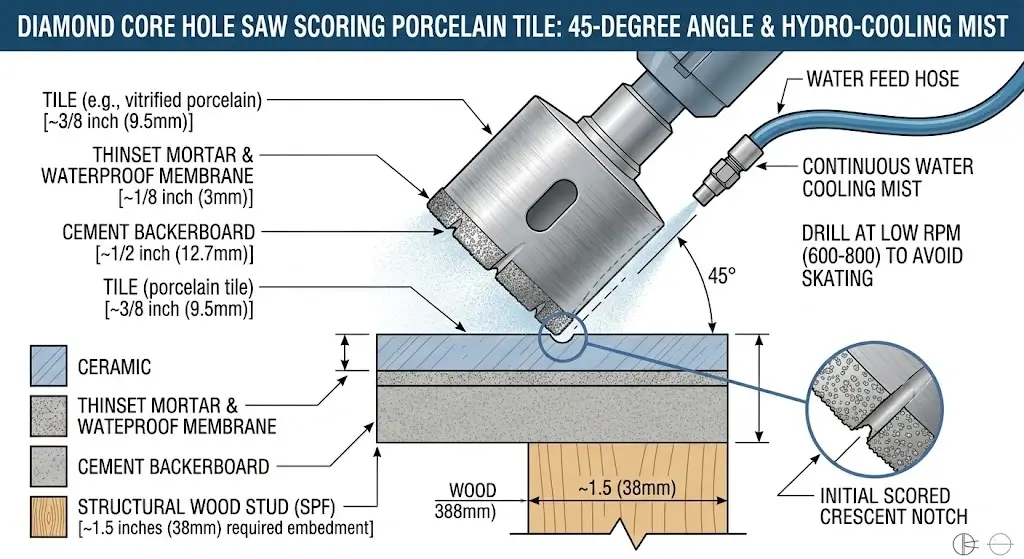
- Initial Scoring (The 45-Degree Angle Technique): High-grade porcelain glazes are slick, causing diamond core bits to skate. Hold the rotary drill firmly at a 45-degree angle to the wall. Start the motor at low speed (600 to 800 RPM) to allow the rim of the diamond hole saw to grind a small crescent-shaped pilot notch.
- Tilting to Perpendicular: Once the notch is 1/32″ deep, slowly pivot the drill body upward until the bit is 90 degrees perpendicular to the wall. Apply steady, moderate inward pressure without forcing the tool.
- Continuous Pressurized Hydro-Cooling: Have an assistant spray water continuously onto the cutting contact zone, or use a water-retention suction guide. Without cooling, the friction generated by grinding porcelain heats the bit above 1,000°F within 15 seconds, melting the diamond braze and causing thermal stress cracks across the tile.
- Penetrating the Backerboard and Framing Pilot: Once through the tile, you will feel the resistance drop as the bit enters the cement backerboard. Stop immediately. Switch to an extended 1/8″ high-speed steel or carbide twist bit to bore a pilot hole 1.75 inches deep into the structural wood stud. Pre-drilling prevents dense SPF studs from splitting when thick #10 stainless screws are driven in.
Phase 3: Specialty Hollow-Wall Fastener Expansion (Non-Stud Points)
In many bathroom layouts, hitting two wood studs with a 24-inch or 36-inch bar is impossible due to plumbing stacks, air mixing valves, or unusual stud spacing. When learning how to anchor grab bars into fiberglass and tile without structural wood backing, you must install code-approved mechanical toggle fasteners like the WingIts Master Grab Bar Fastener or Moen SecureMount Anchor (Model SMA1000CH):
The WingIts Mechanical Compression Process
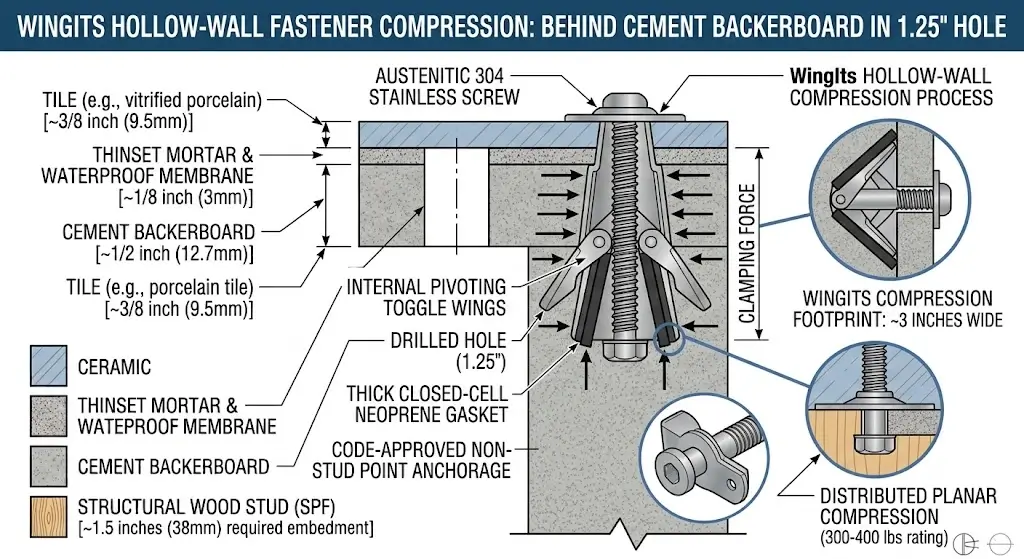
Instead of small 1/4″ screw holes, hollow installations require boring a 1.25-inch (32 mm) diameter core hole through the fiberglass shell or tile backerboard using a specialized diamond hole saw.
- Insert the WingIts anchor assembly into the 1.25″ aperture until its external face flange rests against the finished wall.
- As you drive the central stainless steel machine screw, the internal structural wings pivot 90 degrees inside the wall cavity and pull forward, compressing thick closed-cell neoprene gaskets firmly against the back face of the cement board.
- This mechanical clamping action distributes dynamic pulling force across a 3-inch wide footprint on the backerboard, transforming point pulling stress into distributed planar compression rated for 300 to 400 lbs of shear force.
Phase 4: Hydrophobic Chemical Gasketing and Flange Compression
Water intrusion behind shower tile or fiberglass surrounds causes wooden studs to rot quietly over several years. Water damage softens framing timbers, eventually causing structural screws to pull out without warning. Proper chemical sealing is mandatory:
- Vacuum all porcelain grinding dust and water slurry out of the drilled pilot holes. Wipe the surrounding tile clean with 90% isopropyl alcohol to remove skin oils and debris.
- Inject 100% neutral-cure silicone sealant conforming to ASTM C920 Class 25 directly into the core hole until the cavity is full. Do not use cheap interior acrylic latex caulks—they break down under hot water and harbor black mold.
- Apply a thin ring of silicone sealant around the perimeter of the grab bar’s rear mounting flange, leaving a tiny 1/8″ gap at the very bottom edge. This gap allows any trapped condensation to weep out naturally rather than pooling inside the bracket.
- Align the flange over the silicone-filled holes. Drive the 2.5-inch stainless steel screws using a clutch-controlled drill or ratcheting hand driver until the bracket is held firmly against the tile face. As the screws enter, silicone will squeeze out around the threads, forming a watertight chemical gasket inside the wall.
- Slide the decorative escutcheon cover plate over the mounting flange and press firmly until the internal locking clips engage with an audible click. Let the silicone cure for a full 24 hours before running hot water in the shower bay.
Engineering Analysis: Shear Force vs. Tensile Pull-Out Vectors
Understanding how to anchor grab bars into fiberglass and tile requires knowing the directional physics of human falls. When someone slips on wet tile, their kinetic energy rarely exerts a purely perpendicular pull on the hardware:
| Force Vector Type | Mechanical Direction | Failure Risk Point | Fastener Resistance Strategy |
|---|---|---|---|
| Vertical Dynamic Shear | Downward parallel to the tile wall face | Fastener shank shear; screw snapping off | Austenitic 304 steel shank thickness (#10 or #12 gauge) |
| Outward Pure Tensile | Perpendicular pulling away from wall | Fastener thread strip; tear-out from wood | Minimum 1.5-inch deep thread embedment in wood framing |
| Torsional Moment Arm | Rotational torque around the flange base | Point-load crushing of brittle porcelain tile | 1.5-inch wall clearance standoff; broad 3-hole flange |
This directional force analysis demonstrates why suction grab bars routinely fail in real accidents: suction cups provide outward tensile resistance, but offer almost zero mechanical resistance against downward shear forces along wet tile. For an in-depth review of calibrated load testing on structural hardware, read our lab report on the Moen Stainless Steel Grab Bar Review.
Four Dangerous Installation Pitfalls to Avoid
Review these critical errors before beginning your installation:
- Pitfall 1: Using Hammer Drill Mode on Tile: Hammering fractures the brittle glaze and crystalline structure of porcelain, generating cracks that compromise waterproofing. Always keep your drill in standard rotary mode.
- Pitfall 2: Over-Torquing Screws Against Unsupported Fiberglass: Driving fasteners into hollow fiberglass surrounds without backing blocks or WingIts toggle plates will buckle the surround inward and crack the gelcoat.
- Pitfall 3: Using Standard Hardware Store Plastic Plugs: Yellow, red, or blue plastic expansion plugs are meant for lightweight wall hangings like mirrors (10 to 25 lbs). Under dynamic bodyweight loads, plastic anchors pull free immediately.
- Pitfall 4: Neglecting Hydrophobic Silicone Sealing: Driving screws through bare tile without ASTM C920 silicone allows shower water to run down the screw threads into the structural framing, rotting the studs over time.
Building an Integrated Fall Prevention Strategy
Mastering how to anchor grab bars into fiberglass and tile ensures your safety hardware will never pull loose when someone needs it most. However, comprehensive fall prevention requires securing every transfer point in the bathroom:
- To eliminate transition risks around the commode, explore our companion roundup of the best raised toilet seats with handles.
- For broader wet-room safety upgrades, review our guide on preventing slips in walk-in showers.
Frequently Asked Questions
Can you screw a safety grab bar directly into thin fiberglass surrounds?
No. Standard residential fiberglass enclosures are only 1/8 to 3/16 inches thick and possess near-zero structural load tolerance. Fasteners driven directly into fiberglass without wood stud backing or code-approved hollow-wall anchors like WingIts will rip out immediately under less than 60 lbs of body weight.
How deep must screws penetrate into the wood studs behind shower tile?
Fasteners must penetrate at least 1.5 inches (38 mm) into solid wood framing. Factoring in 3/8-inch tile, thinset mortar, 1/2-inch cement backerboard, and the grab bar flange thickness, you must use heavy-duty stainless steel wood screws that are at least 2.5 to 3.0 inches in length.
What type of drill bit is required for vitrified porcelain shower tile?
Standard carbide tipped masonry bits will dull within seconds and shatter porcelain tile. You must use an electroplated or vacuum-brazed diamond grit core bit, operated at low RPM with constant water cooling to prevent thermal cracking.
How do you prevent water from leaking behind the tile around mounting holes?
Prior to driving the screws, fill the drilled pilot holes completely with 100% neutral-cure silicone sealant conforming to ASTM C920. When the mounting flange is compressed against the wall, the silicone forms a permanent gasket that stops moisture intrusion from rotting the timber framing.
What is the minimum clearance gap required behind fiberglass walls for WingIts anchors?
Code-approved hollow-wall grab bar anchors such as WingIts Master Grab Bar Fasteners or Moen SecureMount plates require a minimum hollow cavity depth of 1.5 to 2.5 inches behind the back face of the fiberglass or backerboard substrate to allow the mechanical wings or toggle plates to pivot and seat flush.
